So far in CyberPanel, we have succesfully set up DKIM and have achieved 10/10 score for outbound emails. We have also installed SpamAssassin and configured it with our mail system so that we can differentiate the spammy emails with genuine emails. But what ifyou receive 100’s of emails every day? What if your email ID is a support or technical ID for an eCommerce website or a blog which has hundreds or thousands of views every day? Naturally, the queries in those email addresses will increase as well.
Also, it is not good if all those spam emails keep coming in the main inbox as [SPAM]. We need them to automatically move to the spam folder. We can also make some custom filters according to our needs. We can filter emails with “Order” in the subject automatically to the order folder in our mailbox, or move emails containing a “Complaint” subject to the complaints folder in the mailbox.
This is what we can achieve by email filtering! We will also be able to set up an autoreply feature by the end of this article.
The Need for Autoreply
One of the most requested and liked features among every email management system or hosting control panel is vacation autoreply.
What if an employee of a company is on vacation and is unable to see his/her emails? With this feature, they can set an autoreply for their mailer. This way, if someone send emails to that employee’s email ID, the mailer will get an automatic reply with the prewritten message.
This feature is used in almost every corporate environment. It can be also used to reply back to a support query made at a [email protected] e-mail ID, telling the mailer that their query has been received.
Getting Started
To enable the features discussed above, we first have to install and enable Sieve, which is, per its wiki, a language for filtering email messages. With Sieve, we will be able to do many things with our mail server.
Step 1 : Installing Sieve for Dovecot
By the following command, we can install the Sieve plugin for Dovecot:
Centos 7 or 8
sudo yum install–enablerepo=gf-plus install dovecot23-pigeonhole -y`
Ubuntu 18 or 20
sudo apt-get install dovecot-sieve dovecot-managesieved dovecot-lmtpd -y
That will install the Sieve plugin. After that we need to configure it so that it starts its daemon.
Step 2 : Configuring Sieve
Once that is installed, lets go to the Dovecot’s configuration folder and edit the Config file:
nano /etc/dovecot/dovecot.conf
Append “sieve” after ‘lmtp’ in protocols on the first line:
protocols = imap pop3 lmtp sieve
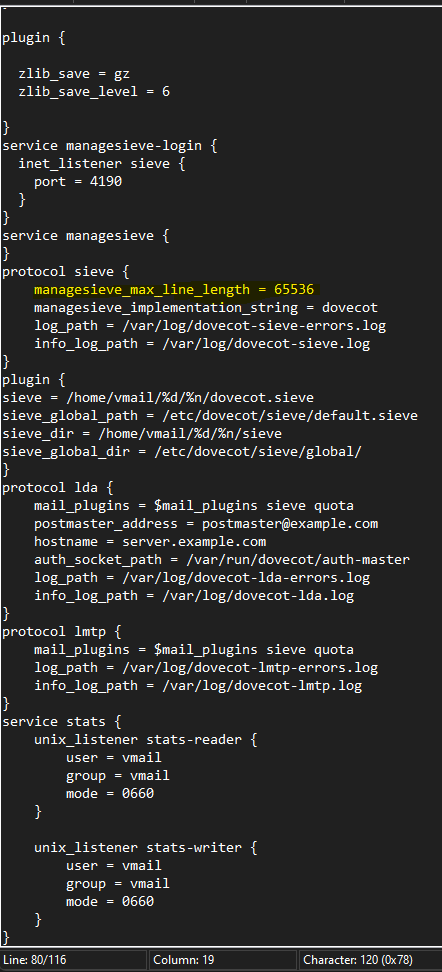
After that, add the following lines at the end of the config file and save the file:
service auth {
    unix_listener auth-client {
        group = postfix
        mode = 0660
        user = postfix
    }

    unix_listener auth-master {
        group = vmail
        mode = 0660
        user = vmail
    }

    user = root
}

service managesieve-login {
  inet_listener sieve {
    port = 4190
  }
}
service managesieve {
}
protocol sieve {
    managesieve_max_line_length = 65536
    managesieve_implementation_string = dovecot
    log_path = /var/log/dovecot-sieve-errors.log
    info_log_path = /var/log/dovecot-sieve.log
}
plugin {
    sieve = /home/vmail/dovecot.sieve
    sieve_global_path = /etc/dovecot/sieve/default.sieve
    sieve_dir = /home/vmail/sieve
    sieve_global_dir = /etc/dovecot/sieve/global/
}
lda_mailbox_autocreate = yes
lda_mailbox_autosubscribe = yes
protocol lda {
    mail_plugins = $mail_plugins autocreate sieve quota
    postmaster_address = [email protected]
    hostname = mail.mydomain.com
    auth_socket_path = /var/run/dovecot/auth-master
    log_path = /var/log/dovecot-lda-errors.log
    info_log_path = /var/log/dovecot-lda.log
}
protocol lmtp {
    mail_plugins = $mail_plugins autocreate sieve quota
    log_path = /var/log/dovecot-lmtp-errors.log
    info_log_path = /var/log/dovecot-lmtp.log
}
Now, to set up some necessary stuff and permission fixes, run these commands from the command line:
touch /var/log/{dovecot-lda-errors.log,dovecot-lda.log}
touch /var/log/{dovecot-sieve-errors.log,dovecot-sieve.log}
touch /var/log/{dovecot-lmtp-errors.log,dovecot-lmtp.log}
mkdir -p /etc/dovecot/sieve/global
chown vmail: -R /etc/dovecot/sieve
chown vmail:mail /var/log/dovecot-*
Restart the Dovecot service after that via:
systemctl restart dovecot
Step 3 : Verifying Whether Sieve is Running
Now that we have done some configuration and restarted the Dovecot service, Sieve should be running on port 4190. To verify that we can use:
netstat -tunlp | grep :4190
It will give us the following output, which confirms that the Dovecot service is using Port 4190, which means Sieve is UP!
netstat is a command-line network utility tool that displays network connections for the TCP protocol, routing tables, and a number of network interface and network protocol statistics. If you are unable to run the netstat command, you can install the same by following:
sudo yum install net-tools -y
Step 4 : Setting up Postfix Delivery
For automatic email filtering to work, we need to edit the Postfix configuration file.
Let’s edit the master.cf file with :
nano /etc/postfix/master.cf
Now, add the following to the end of the file:
dovecot   unix  -       n       n       -       -       pipe
  flags=DRhu user=vmail:vmail argv=/usr/libexec/dovecot/deliver -f ${sender} -d ${recipient}
Important note: Looks like some things have changed and the path /usr/libexec/dovecot/deliver is no longer valid, so if you are not able to get this to work then please use this, ref.
dovecot   unix  -       n       n       -       -       pipe
  flags=DRhu user=vmail:vmail argv=/usr/libexec/dovecot/deliver -f ${sender} -d ${recipient}
Restart the Postfix service by:
systemctl restart postfix
By the end of this step, we have finished the hardest part of command line and configuration file tweaking, have ensured our Dovecot-Sieve service is running on port 4190 as well, and configured Postfix for our autoreply feature.
Step 5 : Log in to the RainLoop Panel (Added info for SnappyMail Login below)
We need to go to our RainLoop’s admin panel, which is located in the /?admin path of our RainLoop’s installation directory.
You can access it by https://yourdomain.com:8090/rainloop/?admin (Replace yourdomain.com with your domain), and the Rainloop admin will open up.

The Default Password is :
username : admin
password : 12345
(We Highly Recommend you change your RainLoop admin password after you log in, on the Security tab).
SnappyMail Admin access
Access URL: https://:8090/snappymail/?admin
username: admin
Password is located at this file → “/usr/local/lscp/cyberpanel/rainloop/data/data/default/admin_password.txt”
Step 6 : Enabling Sieve Scripts for your Domain
After you are inside the RainLoop admin, click on the Domains tab in the left sidebar, and click on your domain for which you wish to enable this feature.

We are using diamondzxd.com in this case.
After opening the domain, open the Sieve Configuration section and check the “Allow User Scripts” and “Allow custom user script” also if you want your users to set up their own email filters. Enter localhost in the Server field and ensure the port is set to 4190. If you want to test the connection to Dovecot Sieve, then click the Test button. If the connection is successful, the SIEVE will turn to a GREEN colour.

Then click the Update button, and our work is done in the RainLoop’s admin panel.
Step 7 : Detecting Whether the Email to Move is SPAM
We need to create a filter to move the email which is marked as SPAM by SpamAssassin to the spam folder in our mailbox.
Before doing that, let us understand how the mail can be differentiated as SPAM.
- By Detecting its Subject. i.e. While configuring SpamAssassin in CyberPanel, we have an option to prefix the SPAM mail’s subject according to our choice. But since that option is configurable, we cannot make it the primary key for differentiating the SPAM emails.
- By looking for the “X-Spam-Flag” Header

Let us have a look at the headers of a SPAM email received in our installation. We can do so by clicking on the “Show Source” option in our email.

We can see the Source to Be:

As you can see, the “X-Spam-Flag”: YES header is present. We can use this header to differentiate it as a SPAM email and do our filtering with it.
Step 8 : Applying Sieve Filter to Move Spam Email to Spam Folder
To get to the main part you were waiting for, log in with your email account to RainLoop and go to the Settings.

On the left hand sidebar, you will see a new tab called Filters. This tab is visible due to the filters we enabled for this domain in the RainLoop admin. Open the Filters tab.

In the Next screen, you’ll see 1 or 2 options for adding scripts. It depends on whether you checked the “Allow Customer User script” option in the RainLoop admin panel while enabling Sieve scripts for the domain in Step 6.
Now, click the “Add a Filter” Button.
Enter spam in the Name, and fill the details as shown in the image below. Click Done, and then click Save.

This filter will now move all of the SPAM emails marked by SpamAssassin by default to Spam folder in our mailbox.
Step 8 : Testing the Spam Filter
Now that the filter is active, let’s test it.
We can send an email to our email ID with the following Test string in the body and SpamAssassin will mark it as Spam:
XJS*C4JDBQADN1.NSBN3*2IDNEN*GTUBE-STANDARD-ANTI-UBE-TEST-EMAIL*C.34X
You can now see that the mail received automatically appears in Spam.

Step 9 : Setting up Vacation Auto Reply
Similar to the above method, now let’s create another autoreply filter.
This time, don’t add any conditions, and it’ll be applied to all incoming messages. In the Actions, select Vacation message, the Reply Intervals in days*, any Recipients you want to assign your work to in your absence, the Subject, and Message. Click Done, and then save it.

*The Reply Interval in days setting will again email the Sender after the specified period in case he sends more than 1 email after the given interval. In general, this is set to 1 (day).
Now, lets check the AutoReply filter by sending an email to the given address:
VOILA!

Conclusion!
Hence, it can be seen in the image above that both the autoreply feature and the automatic move to SPAM feature work flawlessly now, and similarly we can configure them using the filters, as per our requirements. For example, we can create more folders and sort the emails according the subject:
Like, if the subject contains “Order”, “Payment”, “Invoice”: Move it to the Orders folder. Likewise, If the Subject contains “Help”, “Issue”, “Support”: Then move it to the Support folder.
You get the basic idea. The use cases can be many according to your needs. Happy Spam Filtering!
We hope the above article helped you, and if you face any issues in any of the above mentioned steps or if you want to share your self-made Sieve scripts, you can do so at CyberPanel’s Discord server, or you can also ask for help on our community forum!