6 - Self-signed SSL error on Outlook/Thunderbird

After creating an email account in CyberPanel some users would like to configure their email accounts to third party email clients such as Outlook or Thunderbird.

Both these clients have auto-discover functionality, this functionality will try to automatically configure your email settings so that end-user won’t have to do anything. For example, if on Thunderbird I configure:

Thunderbird may suggest the following settings:

Server hostname: mail.cyberpanel.net

IMAP Port: 143

Now Thunderbird will be looking for a valid SSL for mail.cyberpanel.net and if valid SSL is not offered by the server you will get a self-signed SSL error.


How to resolve Self-signed SSL Error

After version v1.9.4 of CyberPanel, upon website creation, CyberPanel will create mail.domain.com as a child domain to while creating a website and also issue SSL for it. Then CyberPanel will add edit /etc/dovecot/dovecot.conf and add the following to the file:

local_name mail.domain.com {
  ssl_cert = </etc/letsencrypt/live/mail.domain.com/fullchain.pem
  ssl_key = </etc/letsencrypt/live/mail.domain.com/privkey.pem
}

and then restart dovecot service using systemctl restart dovecot. This way there will be no SSL errors on either Outlook or Thunderbird.

Manually setting this up

Let say you are on some of the old versions of CyberPanel or you have already created a website before upgrading to v1.9.4. You can go ahead and create mail.domain.com as a child-domain to your master domain also make sure to issue SSL for this domain.

Step 1: Open the file /etc/postfix/main.cf using any editor

sudo nano /etc/postfix/main.cf

Step 2: Comment the first two lines in that file by adding an # sign at the beginning.

# smtpd_tls_cert_file = /etc/pki/dovecot/certs/dovecot.pem 
# smtpd_tls_key_file = /etc/pki/dovecot/private/dovecot.pem

Step 3: Add the following lines after changing. Remember to replace YourPrimaryMailServerDomain with the your own domain.

# provide the primary certificate for the server, to be used for outgoing connections 
smtpd_tls_chain_files = 
/etc/letsencrypt/live/mail.yourprimarymailserverdomain.com/privkey.pem, 
/etc/letsencrypt/live/mail.yourprimarymailserverdomain.com/fullchain.pem

Step 4: In order to support SNI you need to add the following lines at the end

# provide the map to be used when SNI support is enabled 
tls_server_sni_maps = hash:/etc/postfix/vmail_ssl.map

After all the above steps your files should look like this

# smtpd_tls_cert_file = /etc/pki/dovecot/certs/dovecot.pem
# smtpd_tls_key_file = /etc/pki/dovecot/private/dovecot.pem

# provide the primary certificate for the server, to be used for outgoing connections
smtpd_tls_chain_files =
/etc/letsencrypt/live/mail.yourprimarymailserverdomain.com/privkey.pem,
/etc/letsencrypt/live/mail.yourprimarymailserverdomain.com/fullchain.pem

# provide the map to be used when SNI support is enabled
tls_server_sni_maps = hash:/etc/postfix/vmail_ssl.map

Step 5: Create a new file in /etc/postfix with the name of vmail_ssl.map

sudo touch /etc/postfix/vmail_ssl.map

Step 6: Edit the file to add your domain’s SSL certificates to the list like this

mail.yourprimarymailserverdomain.com
/etc/letsencrypt/live/mail.yourprimarymailserverdomain.com/privkey.pem
/etc/letsencrypt/live/mail.yourprimarymailserverdomain.com/fullchain.pem

Step 7 (Optional): If you have more than one domain to be supported add all of them one per line. The resulting file should look like this

# Compile with postmap -F hash:/etc/postfix/vmail_ssl.map when updating
# One host per line
mail.yourprimarymailserverdomain.com /etc/letsencrypt/live/mail.yourprimarymailserverdomain.com/privkey.pem /etc/letsencrypt/live/mail.yourprimarymailserverdomain.com/fullchain.pem
mail.yoursecondarymailserverdomain.com /etc/letsencrypt/live/mail.yoursecondarymailserverdomain.com/privkey.pem /etc/letsencrypt/live/mail.yoursecondarymailserverdomain.com/fullchain.pem
# add more domains with keys and certs as needed

Step 8: Open /etc/dovecot/dovecot.conf

sudo nano /etc/dovecot/dovecot.conf

Step 9: Append the following to the end of the file, replace domain.com with your own domain

local_name mail.domain.com {
  ssl_cert = </etc/letsencrypt/live/mail.domain.com/fullchain.pem
  ssl_key = </etc/letsencrypt/live/mail.domain.com/privkey.pem
}

Step 10: Re-compile postmap with SNI using the following command

postmap -F hash:/etc/postfix/vmail_ssl.map

Step 11: Restart Postfix.

systemctl restart postfix

Step 12: Restart Dovecot

systemctl restart dovecot

Connect again using a mail client and you should not see the error.
well that resovled this Cert issue i was having for past couple of days. Shouldn’t this be automated like in CPanel. I wonder why we have to do it manually.

Under section How to resolve Self-signed SSL Error I believe the following line is missing a forward slash between ‘live’ and ‘mail’.

I believe this should be: ssl_cert = </etc/letsencrypt/live/mail.domain.com/fullchain.pem

Also postmap -F hash:/etc/postfix/vmail_ssl.map returned invalid option ‘F’

I’ve followed these instructions but still getting a self-signed cert for the mail.mydomain.com (root domain is ok, that’s Let’s Encrypt). I ran the following command to re-issue:

/root/.acme.sh/acme.sh --issue -d mail.mydomain.com -d www.mail.mydomain.com --cert-file /etc/letsencrypt/live/mail.mydomain.com/cert.pem --key-file /etc/letsencrypt/live/mail.mydomain.com/privkey.pem --fullchain-file /etc/letsencrypt/live/mail.mydomain.com/fullchain.pem -w /home/mail.mydomain.com/public_html --force --debug

Which returned the following challenge 404 error in red within the response:

mail.mydomain.com:Verify error:xxx.xx.xx.xxx: Invalid response from http://mail.mydomain.com/.well-known/acme-challenge/7n8gZoeKUhkJheUvydnxW7-TDqUQ3w2F5m2KfDmAamw: 404

I’ve checked that the path /home/mail.mydomain.com/public_html/.well-known/acme-challenge/7n8gZoeKUhkJheUvydnxW7-TDqUQ3w2F5m2KfDmAamw DOES exist but I think the url is loading from /home/mydomain.com/public_html/mail.mydomain.com/ which DOES NOT contain the challenge file.

So the challenge file exists in:
/home/mail.mydomain.com/public_html/
But the url is loading from:
/home/mydomain.com/public_html/mail.mydomain.com/

Re-issuing with the path /home/mydomain.com/public_html/mail.mydomain.com/ and removing www.mail.mydomain.com from the issue command resulted in a successful issuance; However when checked with whatsmychaincert.com, and also with openssl, it still said the certificate is ‘self-signed’!

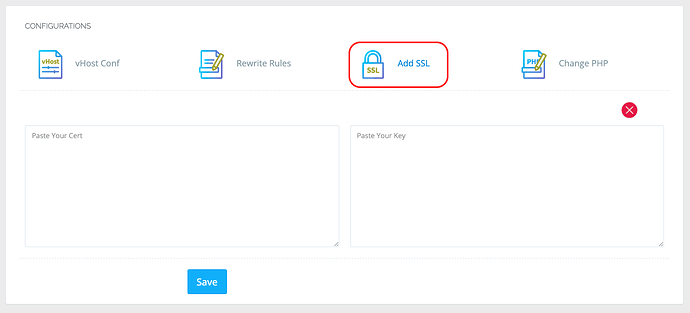
I believe I’ve now solved the issue by taking the certificate and private key that were ‘manually’ generated above and pasting them into the ‘Add SSL’ section in the mail.mydomain.com sub-domain CP screen. Not sure why the ‘Issue SSL’ button was indicating Let’s Encrypt was issued but in fact it was being detected as self-signed, unless there was a path miss-match in the config files. The ‘Issue SSL’ button worked for the root domain.

SSLLabs was giving a grade B because ‘certificate chain is incomplete’, however adding the intermediate certificate below the main certificate returned a grade A.

Since I’ve manually added the LetsEncrypt SSL I assume it won’t auto-renew, so once it’s expired I’ll need to revisit.

Please mine I have been able to configure it, connect it with thunderbird and it’s working but it refuse to work on mailwizz application or smtper
Anytime I try it times out.

I followed every step of this guide, and the 10/10 email guide, but I am still receiving a Self-Signed SSL error. Is it because I’m on Cloudflare? Is there a guide available for how to make this work when using Cloudflare?

I issue the SSL via CyberPanel and it seems okay, but my mail.domain is unsecure and when I try to connect via Gmail I receive an error saying that it is self-signed.

The main domain is secure. It’s my understanding that Cloudflare’s SSL is supposed to cover subdomains, but it is not working. Any suggestions?

Last week I had the same problem. I was able to get a Let’s Encrypt certificate using acme.sh, but my desktop email software and mobile app still pointed to the old certificate, giving me untrusted certificate error.

STEP ONE:
You need to manually add the SSL with the new one. just copy and paste from the paths you assigned in the acme.sh command

Your cert
cat /etc/letsencrypt/live/mail.mydomain.com/cert.pem

Your key
cat /etc/letsencrypt/live/mail.mydomain.com/privkey.pem

To enter the Add SSL for subdomains you need to go Websites > List Domains > mail.mydomain > Manage
or
server:8090/websites/listChildDomains

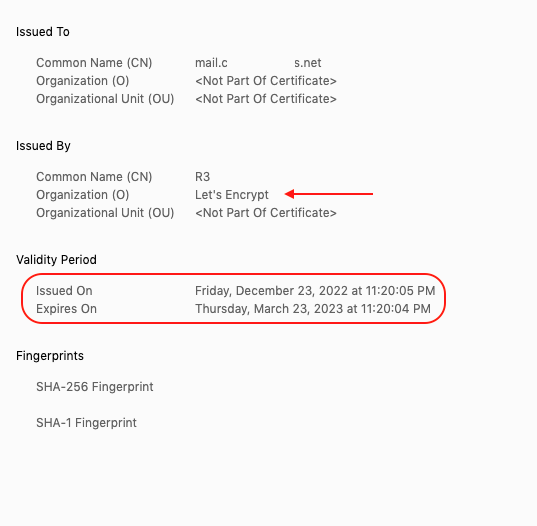
You could test the cert from the browser just click the :lock: next to the url and see the cert info, should say Let’s Encrypt, and the Validity period 90 days (3 months).

If Outlook / Thunderbird / Apple / Gmail still gives you the untrusted cert message.

STEP TWO:
You need to restart postfix and dovecot.

postmap -F hash:/etc/postfix/vmail_ssl.map (Only required if you host multiple email domains)
systemctl restart postfix
systemctl restart dovecot

STEP THREE:
Give me a :heart: if it solves your problem or reply if not :wink:

1 Like

My smtp was failing in Thunderbird. Certificate error.
After setting smtpd_tls_chain_files I had to do another step in thunderbird to get it working:
change smtp port to 465

Hello everyone

I asked here about PTR record PTR Record for email server
I want to know how add this record in cyberpanel?
cpanel and direct admin and some premium panel has it, but I couldn’t find that in cyberpanel

PTR record is added on provider, not on panel.

Hi Usmannasir
What do you mean about “provider”?
How we should tell to our internet company to add this record?
for example, if I add this domain in cpanel / whm
example. com
it will give me a record somthing similar to this:
cpsrv.example.com
this recorde is beond the dns record for domain

What cyberpanel crate for that domain? what is the address?

Please first understand what rDNS is: https://www.cloudflare.com/learning/dns/glossary/reverse-dns/

Here we’ve added some links on how you can add rDNS on different providers: Onboarding and Initial CyberPanel Configurations – Knowledge Base

I am not talking about your internet provider, but the one who provided you with the VPS or the server.

What If its my own server? where would i enter these then?