Normally CyberPanel comes with Web server (OpenLiteSpeed), FTP (Pure-FTPd), Mail Server and DNS Server (Power DNS). If you are planning to set up a dedicated DNS server for your company, you can use CyberPanel to only host your DNS and unload any other extra software that comes with CyberPanel.
In this article, we will see how we can do just that.
Step 1: Install CyberPanel!
For now, CyberPanel does not have a DNS only installer, so you need to normally install and remove unnecessary software. Use the command below to install CyberPanel:
sh <(curl https://cyberpanel.net/install.sh || wget -O - https://cyberpanel.net/install.sh)
This will install all the components, most of which we don’t require in our DNS only setup.
Step 2: Remove Unnecessary Components!
First, remove web server and lsphp
yum erase lsphp53* lsphp54* lsphp55* lsphp56* lsphp70* lsphp71* lsphp72* -y
Remove email components:
yum erase postfix dovecot dovecot-mysql -y
Remove FTP:
yum erase pure-ftpd -y
This will remove all the components we don’t need. However, they will still appear on Control Panel.
Step 3: Setup a Nameserver!
A nameserver is the main component in a DNS system, it will translate your domain names to IP Addresses. So first thing in setting up your own DNS server is to dedicate a domain which you can use to identify your nameserver for other domains. For example, If I choose cyberpersons.com then I can set up two DNS servers as:
- ns1.cyberpersons.com → 192.168.100.1
- ns2.cyberpersons.com → 192.168.100.2
Which means at ns1.cyberpersons.com you have your first DNS server containing all your DNS records and at ns2.cyberpersons.com you have your backup DNS server, in case first goes down second can be used. But in this article, we are going to setup only one DNS server so you can point both ns1.cyberpersons.com and ns2.cyberpersons.com to 192.168.100.1
Register personal name servers at your domain registrar!
This needs to be done only once, I am going to demonstrate this process at Namecheap, however, the process at other domain registrars should be similar too.
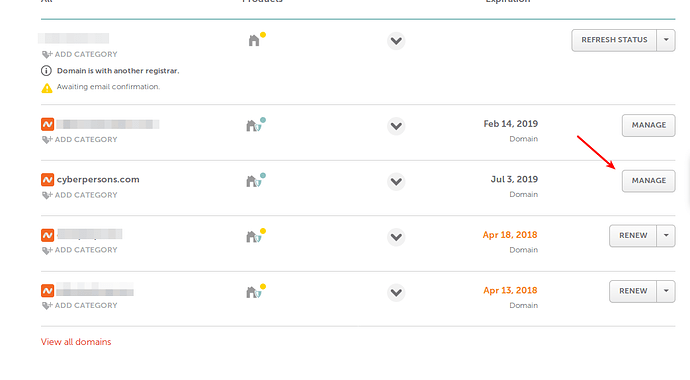
Once you are logged into your Namecheap account you will have a list of your domains, click Manage so that we can manage DNS records for this domain.
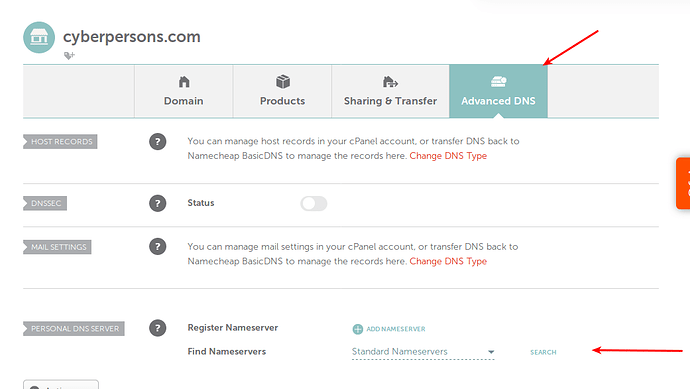
Inside DNS management first click Advanced, from the drop down select Standard Nameservers and click Search to make sure you do not already have personal nameservers registered.
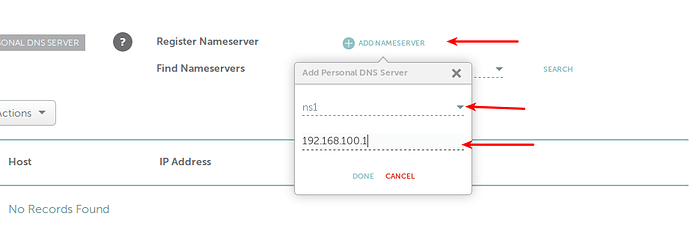
After making sure that you do not have registered any personal nameservers before, you are ready to register your first name server. Click ADD NAMESERVER from drop down select NS1 and enter your IP address. Let us recall our name servers and their IPs:
- ns1.cyberpersons.com → 192.168.100.1
- ns2.cyberpersons.com → 192.168.100.2
As you may notice in the IP box we entered 192.168.100.1
Repeat the same process for ns2.cyberpersons.com as well and use the same IP, because as I’ve mentioned above in this tutorial we are not going to use a separate backup server, in case you have a separate backup server you can use its IP with ns2.cyberpersons.com.
Step 4: Setup Name servers in CyberPanel !
Now that you have registered your nameservers at Namecheap (or any other domain registrar) you need to do this one little step at CyberPanel before you are ready.
Now log into CyberPanel at:
https://:8090
After successful login navigate to:
https://:8090/dns/createNameserver
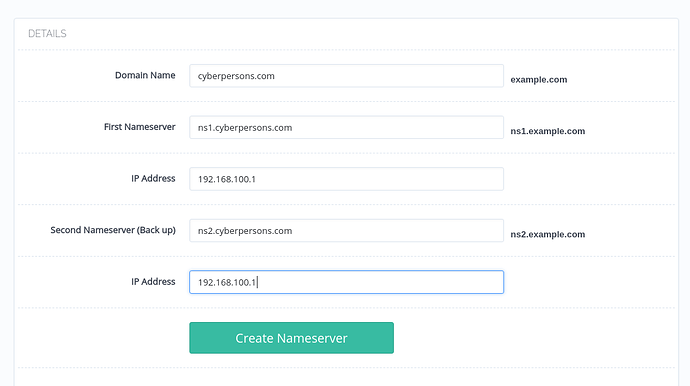
Now fill these boxes accordingly, you might notice that we’ve used the same domain here which is cyberpersons.com, same nameservers, and same IP Addresses, you should also have this set up for this to work. These IPs and nameserver should match with what you have at your domain registrar (which we set up in step 3).
Test your Nameservers setup
Now that you have created nameservers in CyberPanel too, it is time you test and make sure you have everything in correct order. On command line run:
dig cyberpersons.com @<IP Address> ns
Replace IP Address with the IP Address of your CyberPanel installation. Your result should be:
; <<>> DiG 9.10.3-P4-Ubuntu <<>> cyberpersons.com @192.111.145.235 ns
;; global options: +cmd
;; Got answer:
;; ->>HEADER<<- opcode: QUERY, status: NOERROR, id: 20678
;; flags: qr aa rd; QUERY: 1, ANSWER: 2, AUTHORITY: 0, ADDITIONAL: 3
;; WARNING: recursion requested but not available

;; OPT PSEUDOSECTION:
; EDNS: version: 0, flags:; udp: 1680
;; QUESTION SECTION:
;cyberpersons.com.INNS

;; ANSWER SECTION:
cyberpersons.com.3600INNSns1.cyberpersons.com.
cyberpersons.com.3600INNSns2.cyberpersons.com.

;; ADDITIONAL SECTION:
ns1.cyberpersons.com.3600INA192.168.100.1
ns2.cyberpersons.com.3600INA192.168.100.1

;; Query time: 242 msec
;; SERVER: 192.111.145.235#53(192.111.145.235)
;; WHEN: Thu Apr 05 21:48:55 PKT 2018
;; MSG SIZE  rcvd: 113
In your ANSWER SECTION, you can see correct nameservers are being reported back to us. Similarly, ADDITIONAL SECTION tells us that ns1.cyberpersons.com is located at 192.168.100.1 and ns2.cyberpersons.com is also located at 192.168.100.1 which is exactly what we want. If you have a separate backup server for ns2.cyberpersons.com then it should be pointing to that IP Address.
Step 5: Manage DNS for the domain!
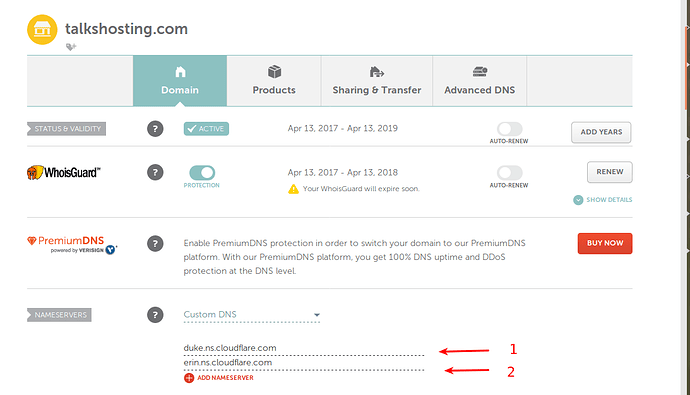
After registering your personal nameservers it is time we start hosting DNS of our domains. The first thing you need to do is go to your domain registrar and update your nameservers (tell your registrar to find DNS records on our nameserver). And in this case your nameservers will be:
These are the personal nameservers we just registered above. We are going to manage DNS records for talkshosting.com in this tutorial and again Namecheap will be used.
Again go to DNS management of your domain at Namecheap (Or your own domain registrar), in the first box enter ns1.cyberpersons.com and in the second box enter ns2.cyberpersons.com
Which means DNS records for talkshosting.com are hosted on ns1.cyberpersons.com and if we fail to obtain records from this server you can try at ns2.cyberpersons.com. In this case, ns1.cyberpersons.com and ns2.cyberpersons.com are the same.
Create DNS Zone
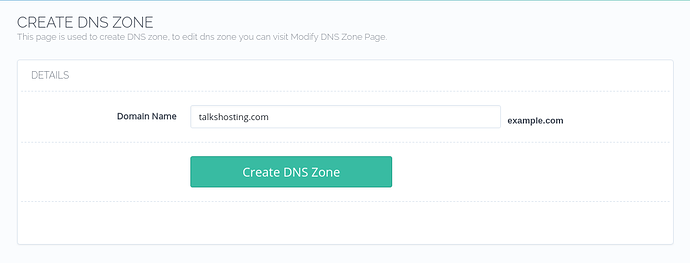
The first step in hosting DNS inside CyberPanel is to create a DNS zone for a domain.
Naviage to → https://:8090/dns/createDNSZone
Enter your domain for which you are going to host DNS, as I mentioned earlier we are going to host DNS for talkshosting.com.
This will create DNS zone for your domain, we can then add and delete DNS records for this domain.
Create an A record
Navigate to → https://:8090/dns/addDeleteDNSRecords
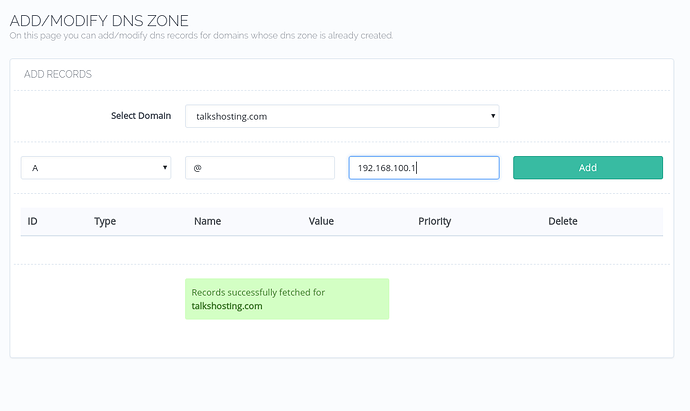
A records are backbones of DNS system, without them, DNS cannot work. They actually do the hard work by converting domain names to IP Addresses, our first A record will be:
talkshosting.com → 192.168.100.1
Which means if someone asks you to resolve domain talkshosting.com, our DNS server will answer back with IP of 192.168.100.1
This is how you add A record in CyberPanel, from drop-down select the domain for which you are going to manage DNS records. Here @ represents the selected domain which is talkshosting.com.
You can now test if the record you added is working using the following command:
dig talkshosting.com @<IP Address>
Replace IP Address with IP Address of your CyberPanel installation, your output should be:
; <<>> DiG 9.10.3-P4-Ubuntu <<>> talkshosting.com @192.111.145.235
;; global options: +cmd
;; Got answer:
;; ->>HEADER<<- opcode: QUERY, status: NOERROR, id: 14525
;; flags: qr aa rd; QUERY: 1, ANSWER: 1, AUTHORITY: 0, ADDITIONAL: 1
;; WARNING: recursion requested but not available

;; OPT PSEUDOSECTION:
; EDNS: version: 0, flags:; udp: 1680
;; QUESTION SECTION:
;talkshosting.com.INA

;; ANSWER SECTION:
talkshosting.com.3600INA192.168.100.1

;; Query time: 238 msec
;; SERVER: 192.111.145.235#53(192.111.145.235)
;; WHEN: Fri Apr 06 17:22:51 PKT 2018
;; MSG SIZE  rcvd: 61
You can see that in ANSWER section we got the correct result.
Create an MX Record
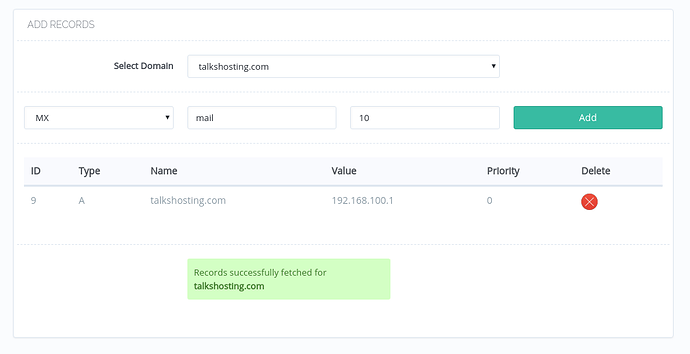
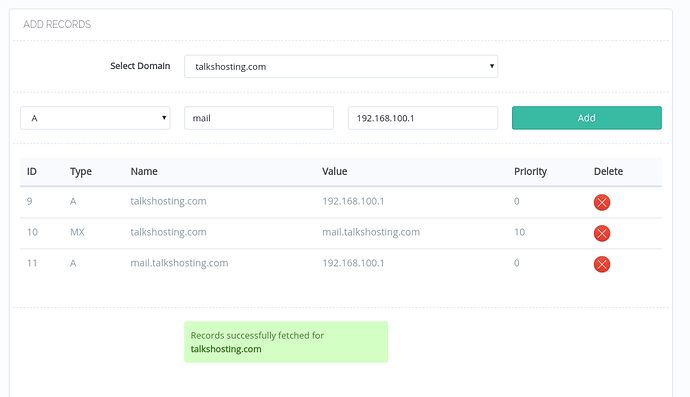
Creating an MX record is a 2 step process, first, we need to create MX record and then corresponding A record.
This will create an MX record, which means mail server for talkshosting.com is at mail.talkshosting.com, but for now, there is no record telling us where to find mail.talkshosting.com. As we’ve discussed above we always need A record for a domain name to IP Address translation, so now you just need to create A record for mail.talkshosting.com
The process of adding A record is similar as above. Now you can test your MX records using:
dig talkshosting.com @<IP Address> mx
We got the following output:
; <<>> DiG 9.10.3-P4-Ubuntu <<>> talkshosting.com @192.111.145.235 mx
;; global options: +cmd
;; Got answer:
;; ->>HEADER<<- opcode: QUERY, status: NOERROR, id: 29584
;; flags: qr aa rd; QUERY: 1, ANSWER: 1, AUTHORITY: 0, ADDITIONAL: 2
;; WARNING: recursion requested but not available

;; OPT PSEUDOSECTION:
; EDNS: version: 0, flags:; udp: 1680
;; QUESTION SECTION:
;talkshosting.com.INMX

;; ANSWER SECTION:
talkshosting.com.3600INMX10 mail.talkshosting.com.

;; ADDITIONAL SECTION:
mail.talkshosting.com.3600INA192.168.100.1

;; Query time: 242 msec
;; SERVER: 192.111.145.235#53(192.111.145.235)
;; WHEN: Fri Apr 06 17:34:40 PKT 2018
;; MSG SIZE  rcvd: 82
As you can see in the ANSWER SECTION we are told that mail server for talkshosting.com is at mail.talkshosting.com, and in ADDITIONAL SECTION we have A record telling us where to find mail.talkshosting.com which is 192.168.100.1 in this case.
Conclusion
This was a brief introduction regarding how you can use CyberPanel as DNS only. You can read following two resources which provides more insight on how you can add further DNS records:
How to register private name servers on Namecheap or Godaddy with CyberPanel!
