Step 1: Configure Glue Records/Private Nameservers
Before configuring CyberPanel, you need to register Glue Records (some registerars call them Private Nameservers or hostnames) at your domain registrar. You can read this article for more details.
In this tutorial we assume that:
- ns1.cyberpanel.xyz - 192.168.100.1 (Is your Master DNS server)
- ns2.cyberpanel.xyz - 192.168.100.2 (Is your Slave DNS server)
Configure them accordingly on your domain registrar using this guide.
Step2: Install CyberPanel on both Servers
Install CyberPanel on your Master and Slave servers.
Step 3: Configure Master CyberPanel
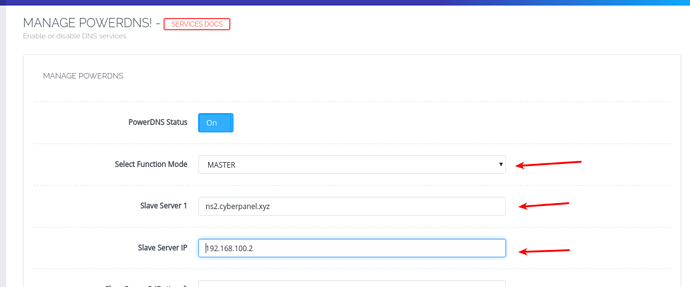
Once CyberPanel is installed, log in to your CyberPanel dashboard and navigate to → :8090/manageservices/managePowerDNS
It gives you option to configure up to 3 slave servers. However we are going to configure only one. From dropdown select Master.
Slave Server 1 → ns2.cyberpanel.xyz (Your value here will be different according to your slave server).
Slave Server IP → 192.168.100.2 (IP of your slave server).
Once done, click Save Changes, your master is now configured. You need to configure your slave so that it can accept DNS queries.
Step 4: Configure Slave CyberPanel
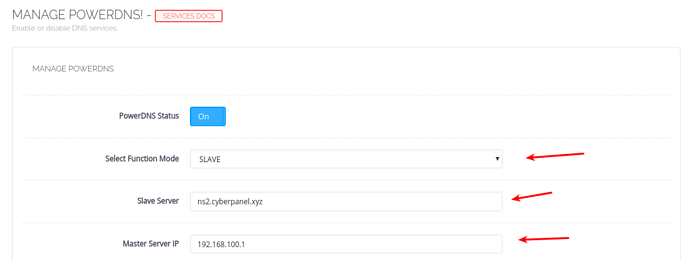
Log into your slave CyberPanel dashboard and navigate to → :8090/manageservices/managePowerDNS
Here you will enter two things:
Slave Server → This is name of slave server such as ns2.cyberpanel.xyz
Master Server IP → Don’t confuse it with Slave IP, you need to enter IP of master server here.
Once done click Save Changes.
Step 5: Confirm Replication is Working
Once all of the steps above are completed, open your Master CyberPanel and create website, now go to your CyberPanel Slave and make sure zone is replicated there.
On slave you can also use this command to make sure that Master CyberPanel is sending notifications to slave about newly created DNS zones:
journalctl -f | grep pdns

