To set up Mailcow with CyberPanel, follow this comprehensive step-by-step tutorial. This guide assumes you have a basic understanding of using the terminal and understanding of how to setup a CyberPanel server.
Requirements
- Latest CyberPanel installed on Ubuntu 20 - 22.04, Alamalinux 8, Rocky Linux 9 without postfix installed (NO CyberPanel mailserver setup)
- Access to the above server as ROOT
- Fully qualified domain name (FQDN) for your mail server (e.g., mail.example.com)
- Ensure that ports 25 (Postfix SMTP), 993 (Dovecot IMAPS), 465 (Postfix SMTPS), 143 (Dovecot IMAP), 587 (Postfix Submission), 110 (Dovecot POP3), 995 (Dovecot POP3S), 4190 (Dovecot ManageSieve) are open
Step 1: Install and Setup Docker and Docker Compose
$ curl -sSL https://get.docker.com/ | CHANNEL=stable sh
# After the installation process is finished, you may need to enable the service and make sure it is started (e.g. AlamaLinux)
$ systemctl enable --now docker
Reference: Install mailcow - mailcow: dockerized documentation
Step 2: Install Mailcow
Clone the master branch of the repository, make sure your umask equals 0022. Please clone the repository as root user and also control the stack as root.
$ su
# umask
0022 # <- Verify it is 0022
$ cd /opt
$ git clone https://github.com/mailcow/mailcow-dockerized
$ cd mailcow-dockerized
$ ./generate_config.sh
Step 3: Change configuration of mailcow at /opt/mailcow-dockerized/
$ nano mailcow.conf
You will have to make changes to HTTP bindings i.e. nginx port, ssl port ilke this
# ------------------------------
# HTTP/S Bindings
# ------------------------------

# You should use HTTPS, but in case of SSL offloaded reverse proxies:
# Might be important: This will also change the binding within the container.
# If you use a proxy within Docker, point it to the ports you set below.
# Do _not_ use IP:PORT in HTTP(S)_BIND or HTTP(S)_PORT
# IMPORTANT: Do not use port 8081, 9081 or 65510!
# Example: HTTP_BIND=1.2.3.4
# For IPv4 leave it as it is: HTTP_BIND= & HTTPS_PORT=
# For IPv6 see https://docs.mailcow.email/post_installation/firststeps-ip_bindings/

HTTP_PORT=8080 # CHANGE HERE TO SOMETHING LIKE 8082 OFCOURSE IF THAT PORT IS OPEN
HTTP_BIND=

HTTPS_PORT=443 # CHANGE HERE TO SOMETHING LIKE 444 OFCOURSE IF THAT PORT IS OPEN
HTTPS_BIND=
Then run the following commands under /opt/mailcow-dockerized/ to complete the setup:
$ cd /opt/mailcow-dockerized/
$ docker compose pull
$ docker compose up -d
If no errors are reported at the end of each of the above commands then you have mailcow all setup!
Reference: Install mailcow - mailcow: dockerized documentation
Step 4: Create a CyberPanel website for mail.yourdomain.com
The assumption is your mailserver domain will be mail.yourdomain.com therefore, we will need to create a website for it.
Go to https://SERVER_URL.com/websites/createWebsite and create a website. Make sure NOT to check the following:
- SSL
- DKIM Support
- open_basedir protection
- Create Mail Domain
Step 5: Setup Reverse Proxy
a) With OpenLiteSpeed follow this guide - Reverse Proxy Traffic to Docker Container on CyberPanel e.g.
# /usr/local/lsws/conf/httpd_config.conf
extprocessor dockerbackend {
  type                    proxy
  address                 127.0.0.1:8082 <--- the HTTP port we setup in /opt/mailcow-dockerized/mailcow.conf
  maxConns                100
  pcKeepAliveTimeout      60
  initTimeout             60
  retryTimeout            0
  respBuffer              0
}
b) With LiteSpeed follow this guide - Reverse Proxy Traffic to Docker Container on CyberPanel e.g.
<extProcessor>
      <type>proxy</type>
      <name>dockerbackend</name>
      <address>127.0.0.1:8082</address>  <--- the HTTP port we setup in /opt/mailcow-dockerized/mailcow.conf
      <maxConns>100</maxConns>
      <pcKeepAliveTimeout>60</pcKeepAliveTimeout>
      <initTimeout>60</initTimeout>
      <retryTimeout>0</retryTimeout>
      <respBuffer>0</respBuffer>
</extProcessor>
Use Rewrite Rules to Proxy traffic to your Container
Add this rule to rewrite rules for mail.yourdomain.com
REWRITERULE ^(.*)$ HTTP://dockerbackend/$1 [P]
Note: you can always change dockerbackend name to anything you deem fit to identify your mailserver
Reference: Reverse Proxy Traffic to Docker Container on CyberPanel
You can now access https://${MAILCOW_HOSTNAME} i.e. https://mail.yourdomain.com with the default credentials admin + password moohoo . Make sure to change these details i.e username and password for security purposes.
Step 6: Add Domain
Use the Mailcow UI to add domains.
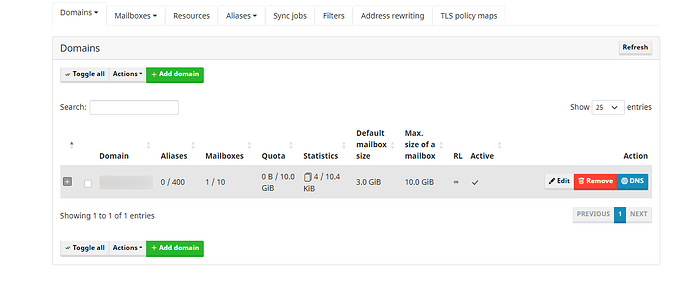
Go to https://mail.yourdomain.com/mailbox and add any client domain you have you want to seup emails for it can also be yourdomain.com
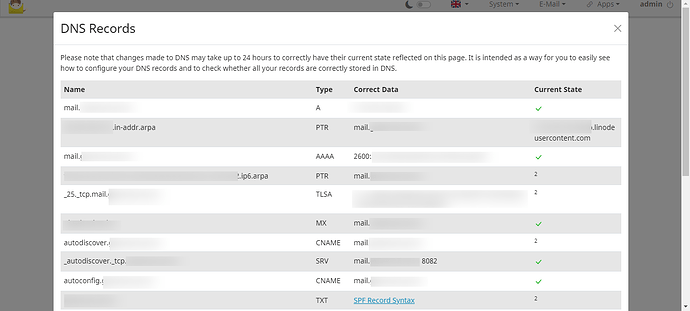
After you add that domain successfully you will need to click DNS button next to that domain record on the list under Domains. Make sure to create all the DNS records without a green tick on the right side of that table (the ones with question mark ?):
Step 7: Add Mailbox
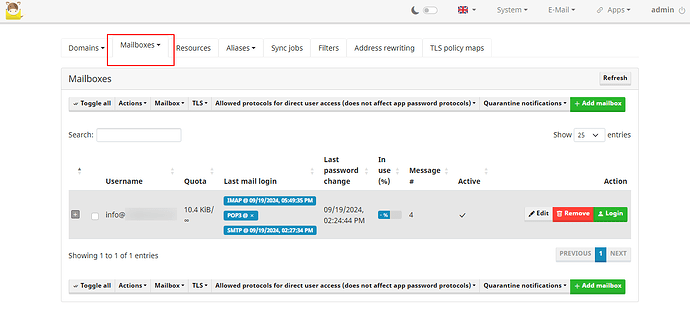
Use the Mailcow UI to create user mailboxes as needed under Configuration → E-Mail → Mailboxes.
Go to https://mail.yourdomain.com/mailbox and add select mailbox tab
Add new mailbox i.e. [email protected] for example. Note that you can set a temporary password which your user or customer will have to change it on next signin to webmail client.
Conclusion
You can now access this mailbox i.e. [email protected] for example under https://mail.yourdomain.com/SOGo using email address and mailbox password you setup in previous step.
Now try to send and receive afew emails from and to this mailbox. It should work!
Upgrading Mailcow
Follow the steps here - Update - mailcow: dockerized documentation
Backup Mailcow
Follow the steps here - Maildir - mailcow: dockerized documentation and MySQL (mysqldump) - mailcow: dockerized documentation
If you encounter any issues with Mailcow, you can refer to their documentation or seek assistance from their community.


