WordPress offers two types of themes, one is free and the other one is a premium (paid themes). WordPress themes that offer incredible features, speedy page load times, and assurance of extraordinary features. Some of the features are free and others usually need a premium subscription. In this article, we are talking about OceanWP, how we use it and what its features are, how we can make our website looks incredible as others.
It has both free and premium plugins available.
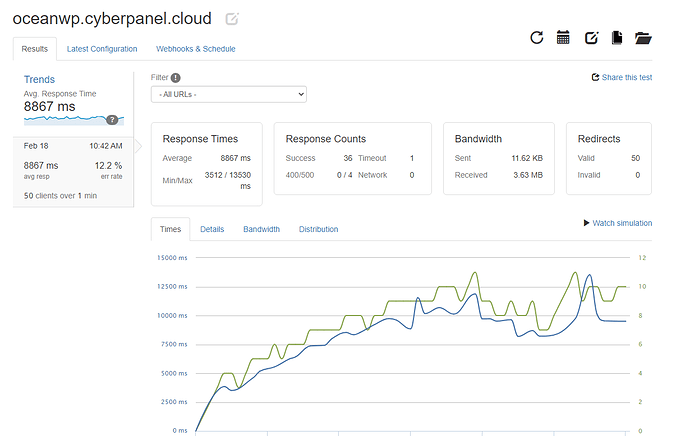
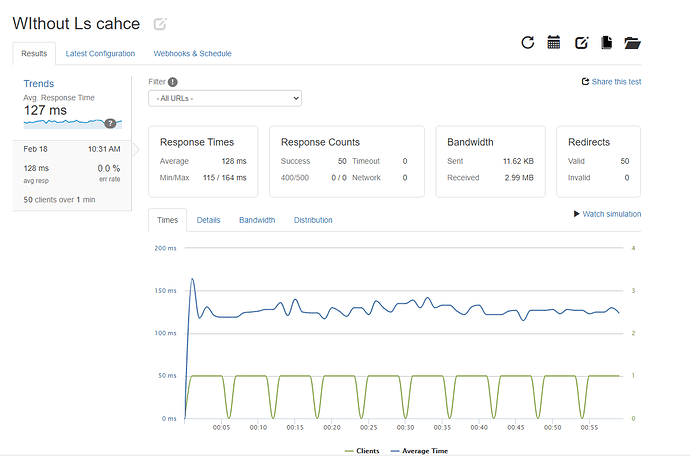
Loader.io results for OceanWP
We’ve deployed this WordPress site using the WordPress Manager
Before digging deep into the article, I will give you a brief overview of the benchmarks we performed on OceanWP in two scenarios.
Scenario 1 – Plain OceanWP
Note: Without any cache plugin or CSS/JavaScript optimizations:
**Scenario 2 – With LSCache Plugin for WordPress:
**
Note: With CSS/JavaScript combined and minified
At the end of this article, there are detailed instructions on what we did (optimizations wise) and results from Google Console are also added.
1. About OceanWP:
OceanWP theme is a completely customizable WordPress theme with a lightweight code base where any person who wants to make its website, can do so easily by using ready-made demos plus it also allows to add custom code/design changes. The developers designed the OceanWP theme with a strong purpose on both usefulness and style. An important reason for this popular theme is the availability of a large number of demos that you can modify in a couple of clicks. In this theme, the quality is very much high (in terms of speed as well) and interesting. It offers multiple demos that can be utilized for any kind of website, such as, a full-fledged WooCommerce store, corporate site, or a simple blog. Everything is covered in demos and easily extensible as well.
2. Why OceanWP is good to use?
- Page Speed.
If you build websites already, you will definitely understand that page speed is a central piece of the achievement of any page.
Users expect pages to load quickly and seamlessly on any device and will quickly go elsewhere if your pages don’t. Google also gives a ranking boost to your website if your page speed is good (among its other metrics) so it is even more important that your site loads fast.
There are detailed performance benchmarks available at the end of this article.
- Beginner-friendly
OceanWP is highly rated for its availability. OceanWP is very user-friendly that any new developer can easily understand its features, it is not difficult to use, it’s easy to set up with page builders that are also user-friendly.
As we know there are multiple themes where they apply restrictions to their widgets like we cannot make our custom header or footer but in OceanWP there are no restrictions. In this theme, we can add as many menu items in the header to make our header as we want. That’s why OceanWP is beginner-friendly. Most developers use this theme instead of others.
- Fast Load time
We already mentioned before that the OceanWP loads quickly that’s why it is one of the fastest loading WordPress themes we see on the list.
- Ecommerce compatible
If you want to make a WooCommerce site, OceanWP has a lot of support for the eCommerce plugins and will enable a WooCommerce menu section within the customizer. It’s a fully-featured edition with upsells, cross-sells, different checkout options, and the ability to control a wide range of selling options. If you’re launching an online store, the OceanWP theme integrates with WooCommerce like no other theme in the market does.
3. How to install the OceanWP theme?
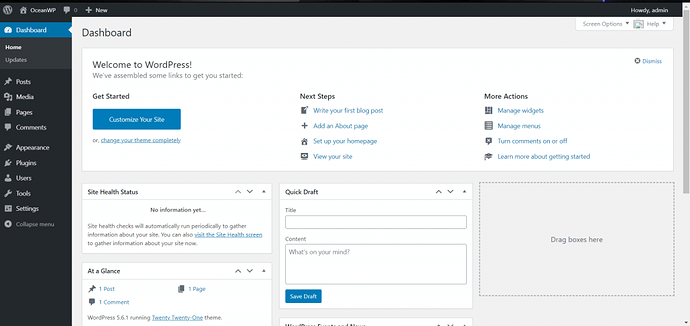
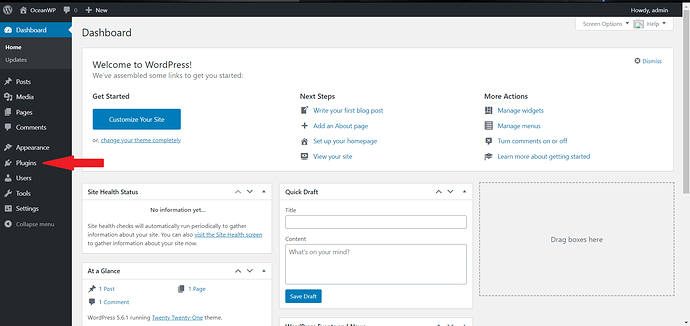
Sign in to the admin dashboard of your WordPress site, your dashboard screen will look something like this:
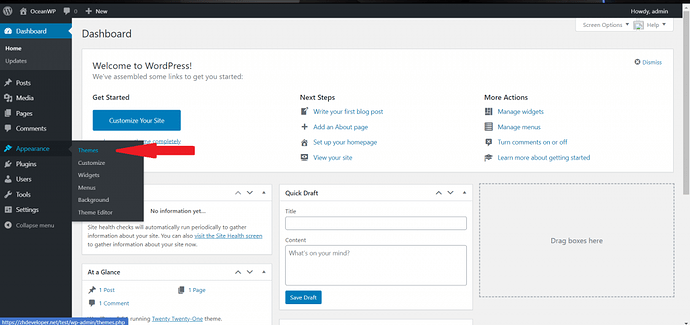
and go to Appearance in your sidebar of the dashboard then hover on appearance and click Themes.
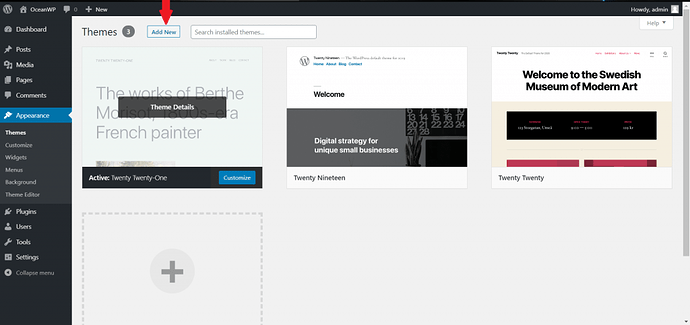
Now you can see your theme window here you can add a new theme.
As you can see in the image below,
Click Add New button,
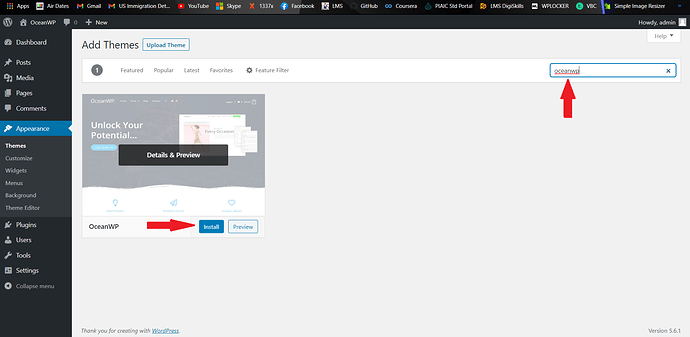
Click the search bar, and search for oceanWP, as you can see in the below image there is a blue button of install, now you can click on it (install button).
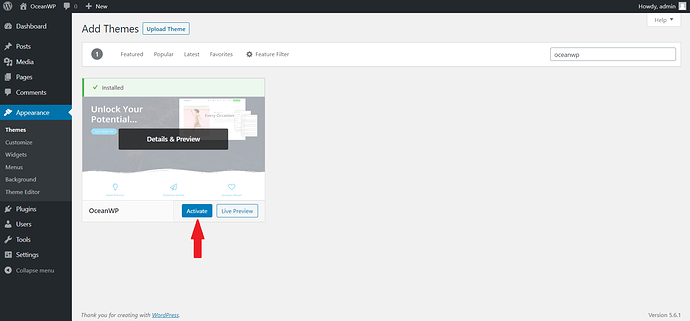
After installing the theme you can see in the below image there is a blue button of activate, now you can click on it (activate button).
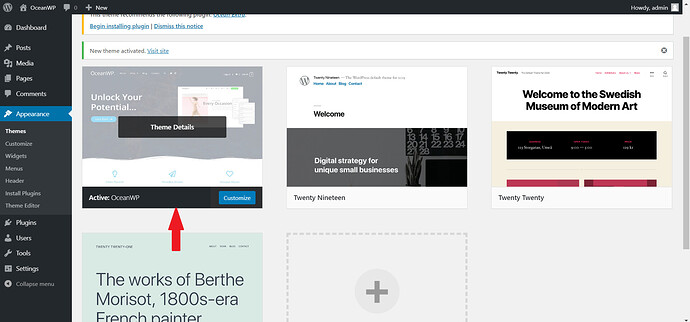
Once installed and activated, it will look something like this:
4. Recommended Plugin with OceanWP
To utilize the maximum power of OceanWP, they recommend you to install some plugins, click Plugins from the left side-bar as you can see in the image:
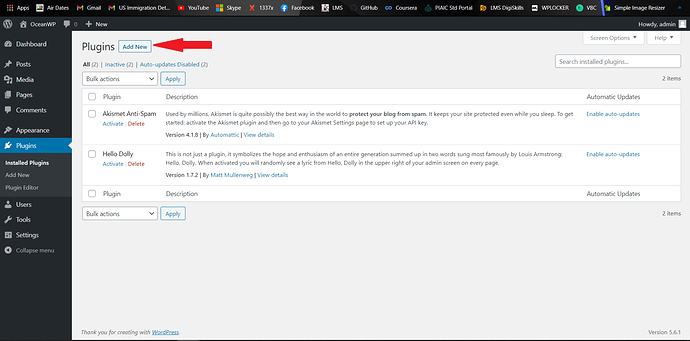
After clicking on the plugin, you can see the plugin section where you find the Add New button at the top of the plugin section. As you can see in the image below;
Click the search bar, and search for the ocean extra plugin, as you can see in the below image there is a search on the top right side,
then you find some plugins but we have to install the Ocean Extra plugin as you can see in the below image. Now click on the install now button.
After successfully installing the Ocean extra plugin, and there’s a blue button of **activate, ** now you can click on it to activate the plugin as you can see in the below image,
PAGE BUILDERS
OceanWP theme supports many page builders like Elementor, WPbakery, Beaver Builder, Brizy, Visual Composer, Divi, SiteOrigin, and so much more, these are very popular page builders. In this article, we will briefly describe OceanWP integration with Elementor.
Elementor Integration
Elementor is an incredibly powerful page builder and can work with OceanWP to create unique designs and you can easily build any section you want in your website with the help of Elementor page builder.
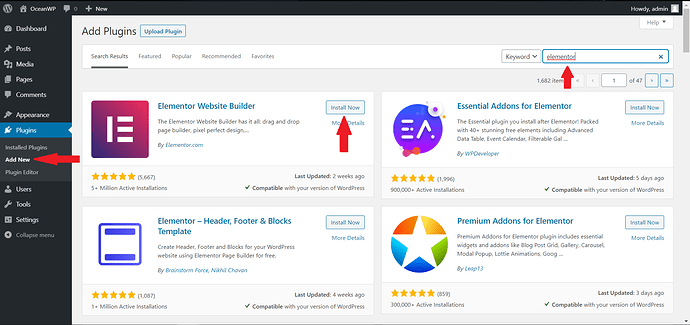
First, we have to Install the Elementor plugin.
Once again click on Plugin, as you can see below the image. Search for elementor website builder then you can see the install now button in below image, Click on the install now button
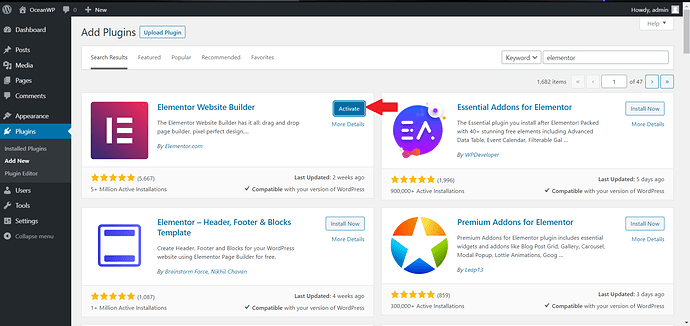
You will need to activate the plugin by clicking on the blue button of Activate. As you can see below image
WooCommerce integration
WooCommerce integration is another strong point of OceanWP and ideal for implementing eCommerce elements to a standard website or building an entire online store using the OceanWP theme.
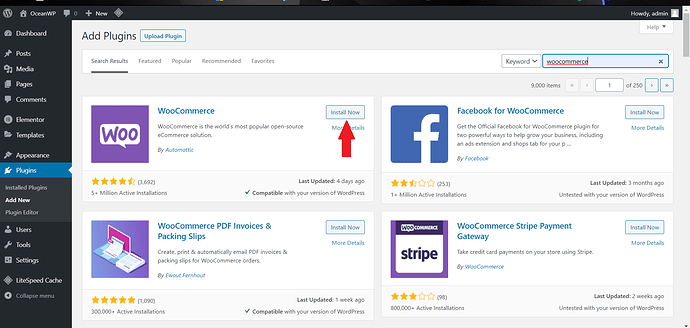
First, we have to Install the Woocommerce plugin.
Similarly each for Woocommerce plugin from the plugins section then you can see the install now button in below image, Click on Install Now button
You will need to activate the plugin by clicking on the blue button of activating. As you can see below image
5. Difference between free and Paid Version:
OceanWP theme is free and not paid. You only have to pay for premium extensions that too if you want to add extra functionalities to the theme. There’s absolutely nothing OceanWP has left (features/design-wise). The moment you install this theme, it appears to be a premium theme that can be reshaped and transformed the way you want. This theme provides most of the features which you only find in premium themes.
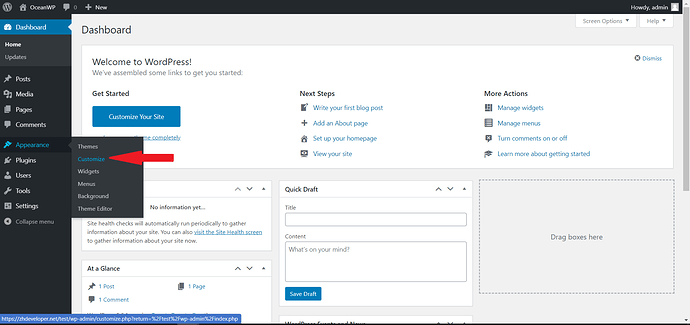
6. WordPress Customizer settings
The Ocean Extra plugin adds new ways to customize your website and makes it simple to change any installed theme in any way you want. If you open OceanWP from your WordPress dashboard, you will see the Theme Panel with the main site-wide customization options.
OceanWP presents a basic wizard to edit your website and make it exactly how you like. From adding panels to the ability to change the typography, add logos, add color schemes, top bar options, and more, you can control the general aspects of your website design from this single panel.
The top section includes checkboxes where you enable features within the page and post-editors. The lower panel opens up further options for logos, favicons, colors, fonts, and all the things that will make the website yours.
7. How to create a header in OceanWP
Header design is a central part of both WordPress and OceanWP. You can control all aspects of header design and behavior from here.
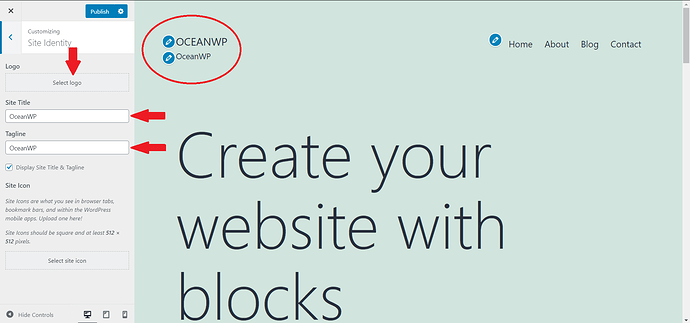
Select Upload Your Logo from the theme customizer panel or Header and Logo from the main OceanWP menu. Upload your logo, resize if necessary and you’re good to go.
Click on the select logo, here you can also edit your site title and a tagline of the website, as you can see in the below image
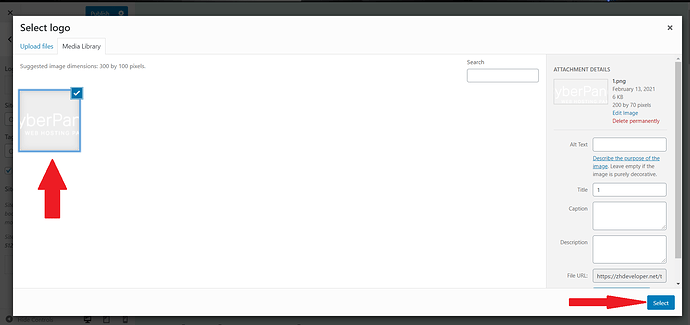
After clicking on the select logo, you find this window where you can add or drag your image or logo for your website then select it and click on blue select button which is situated at the right bottom of the window. As you can see in your below image.
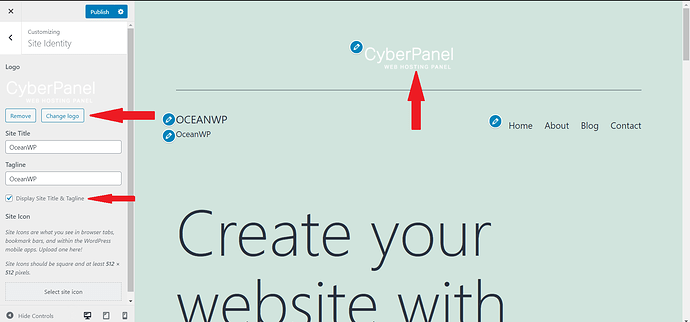
If you want to change your logo then there’s also a button to change the logo.
If you want to display or hide your site title, you can check or uncheck the checkbox of the display site title and tagline. In the below image the checkbox is checked, here you can see the site title and a tagline of your page.
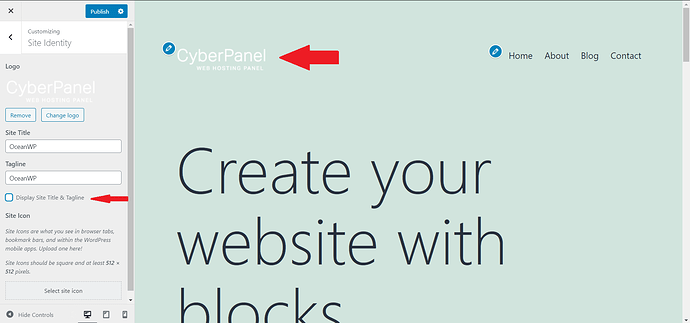
In the below image the checkbox is unchecked, here you cannot see the site title and tagline of your page.
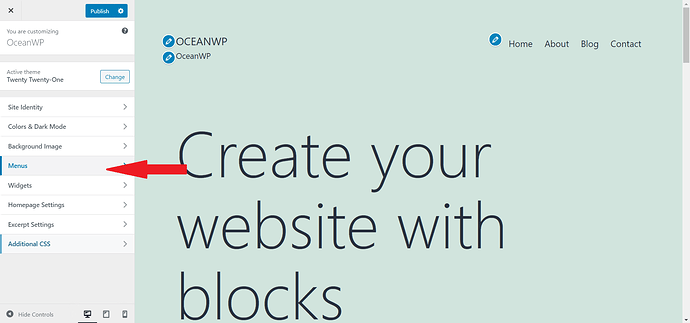
If you want to create your menu, here is an option in the customize window
In the sidebar, we have a menu option, click on it
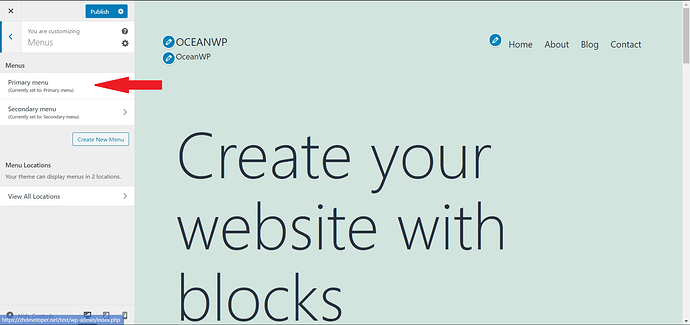
After clicking on the menu option there are two option one is a primary menu which is the header menu and the other one is a secondary menu which is the footer menu
Now click on the primary menu as you see in the below image
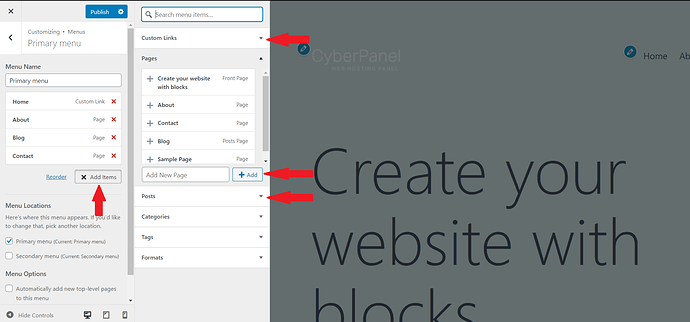
After clicking on the primary menu you can add or create (pages, posts, custom links, etc).
First, we have to click on A****dd items then we can add or create (pages, posts, custom links, etc) by adding items on the menu.
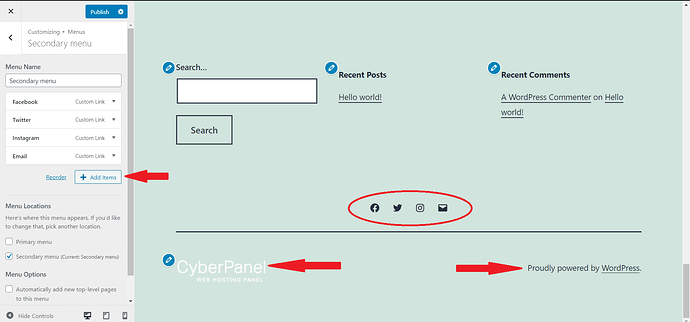
8. How to create a footer in OceanWP
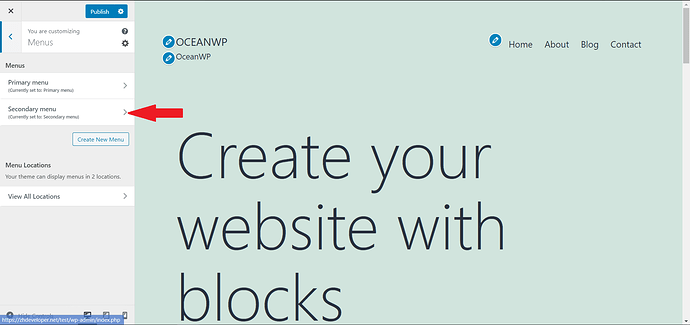
After clicking on the menu option there are two option one is a primary menu which is the header menu and the other one is a secondary menu which is the footer menu
Now click on the secondary menu as you see in the below image
After clicking on the secondary menu you can add or create (pages, posts, custom links, etc).
First, we have to click on A****dd items then we can add or create (pages, posts, custom links, etc) by adding items on the menu.
9. Managing the blog
If you want to add a blog to your website or manage it there’s a very easy way to add a blog and manage it
First, go to the dashboard for your WordPress website as you can see in the below image. Here is the post option in the sidebar of your dashboard. Click on the post option
After clicking the post option you get the post section where you can find additional new button at the top of the post section, as you can see in the below image. Click on the add new button.
After clicking on add new button you get this window, where you can add your post
- On the first arrow, you can add or edit the title of your post
- On the second arrow, you can write the content of your blog
- On the third arrow by clicking or plus (+) button you get many options (insert an image, paragraph, heading, quotes, gallery, list, etc)
- After creating or editing your blog, you have to click publish button as you can see in the fourth arrow in the below image. If you miss publishing your blog then it will be deleted.
10. Site typography
You can use the Typography menu in the customizer to control every little thing of text on your website. It covers headers, menus, body text, top bar, navigation, dropdown menus, sub-headers, and even breadcrumb fonts. If you’re building a website, you will likely already know the power of a good font and you can integrate the core WordPress fonts with those from Google and other sources.
11. PROs & CONs of OceanWP
PROs
The positive elements of OceanWP include:
- Ease of use: It is easy to build a premium and extraordinary great website. Working with WooCommerce or Elementor is equally straightforward.
- Page speed: The ability to build your pages as you want and for them to still be lightning-fast is excellent. OceanWP has the ability to disable scripts and CSS to take that even further. As scripts are one of the main frustrations for any website owner working with a Page Speed Insight and this will be very beneficial.
- Restriction Free: OceanWP is free from restrictions as compared to many themes, they restrict you for many things in menu items, they have a limit for menu items, and logo position styling and so much more. But OceanWP is totally free from restrictions we can add as many menu items as we want and OceanWP also gives you the best and latest logo positioning styles, where you can easily customize your header as you want and create the latest and unique style of your header.
- Price– The core OceanWP theme is free and no one can disagree on it. Some of the plugins are also free and again, that is the best thing. Even the premium plugins are reasonably priced.
- Integrations and extensions– The theme has tight integration with other popular plugins such as Elementor, WPBakery, and WooCommerce, etc. And these plugins provide their extension version where they have also great features too.
- Fast, Lightweight, and Cleanly Coded: OceanWP is very light and loads quickly over normal layout and theme functions, it’s a great choice especially if you care about user experience. And also in this theme, you don’t need to do custom coding because this theme already provides everything.
- Loaded with lots of options: After you install and start to customize the OceanWP along with its Ocean Extra plugin you’ll immediately notice that there are so many options available to start from. Right from the header to the footer to hook areas, you can change it all.
- SEO-friendly: OceanWP is SEO-friendly, and practices such as proper headline HTML tags, proper site navigation structure, and so on.
- Time & Money Saver for Freelancers: If you are a freelancer and you work for clients, the best thing you can do is get the OceanWP and use its demo import and export feature to quickly set up their websites.
- E-commerce Enhancer: OceanWP integrates with Woocommerce and furthermore enhances its features, appearance, and functionality. This way you can expect more conversion in your online store with lesser compatibility issues.
CONs
- Building pages can be tiresome: OceanWP is reliant on two-dimensional checkboxes or select options to build pages. That’s fine for smaller websites but can become tiresome if you’re building larger sites. And in that case, you have to do some coding as well.
- Overwhelming Customizer: The moment you open the appearance customizer setting, you’ll notice there are just way too many options to handle and you don’t know where to start with and where to find a particular setting. That’s something any beginner might feel.
- Cache Error: In OceanWP you find cache error sometimes and for that, you can also install a plugin for caches remover. In my perspective, it is very much annoying,
12. Speed test for OceanWP:
At the end of this article, we are going to do a small test for the OceanWP theme to test the speed and performance of the site. Pre-conditions for the test.
-
Ocean WP theme
-
Lingerie eCommerce demo
-
All required Plugins
Tests case for OceanWP theme.
- Simple Page load without any Cache Plugin
- With CSS Combined and Minified using LSCache for WordPress Plugin (everything else is disabled)
- With JavaScript Combined and Minified using LSCache for WordPress Plugin (everything else is disabled)
- CSS/JS Combined with server level caching enabled.
NOTE: We imported this demo and this is an eCommerce heavy demo if you want a lite one you can import any other.
Simple Page load without any Cache Plugin:
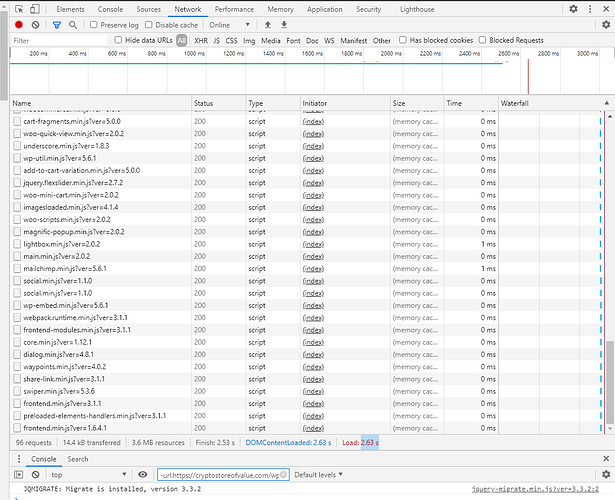
In our first case, we simply install the OceanWP theme and then import the demo stated above, To check the speed and performance of the site we use a simple Developer tool of chrome you can use any, we checked the following things that we needed for the performance test. Just open your site on the browser and press CTRL+SHT+I. Go to the Network tab and reload.
- A total number of files while loading: 96
- A number of CSS file: 26
- A number of JS files: 34
- Load Time: 2.63 s
- Page Size: 3.6 MB
These are some statistics that we got when we load the page without any cache plugin or optimization.
Loader.io Test Results (Without any Cache Plugin or optimizations):
With LSCache for WordPress Plugin – CSS Settings enabled (everything else is disabled):
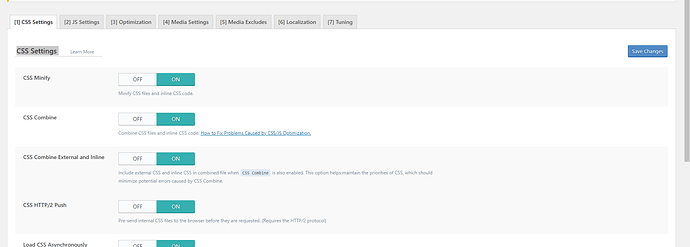
In the second case, we only did some CSS configuration from the LS cache plugin. Go to Page Optimizations → CSS Settings enable all CSS optimizations and then test the thing we checked above.
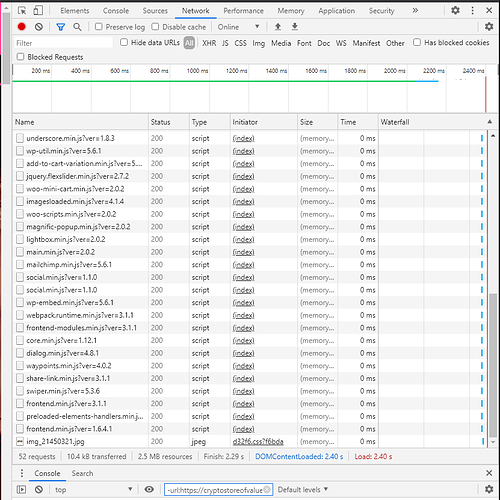
- A total number of files while loading: 52
- A number of CSS file: 1
- A number of JS files: 34
- Load Time: 2.40 s
- Page Size: 2.5 MB
With LSCache for WordPress Plugin – JavaScript settings enabled (everything else is disabled):
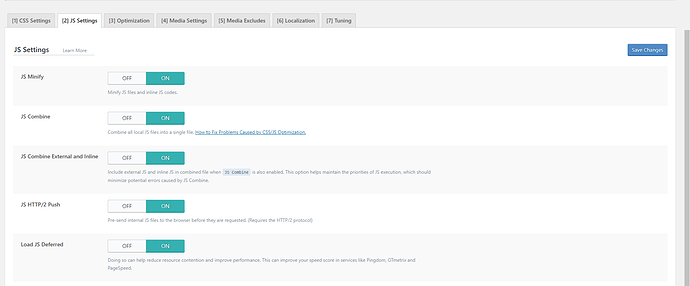
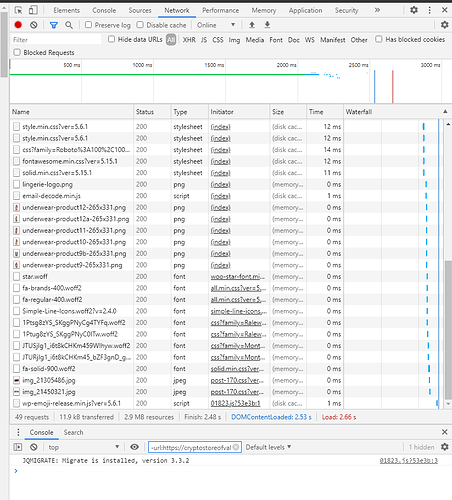
In the third case, we only did some JS configuration from the LS cache plugin. Go to Page Optimizations → JS Settings enable all JS optimizations and then test again.
- A total number of files while loading: 49
- A number of CSS file: 26
- A number of JS files: 4
- Load Time: 2.66 s
- Page Size: 2.9 MB
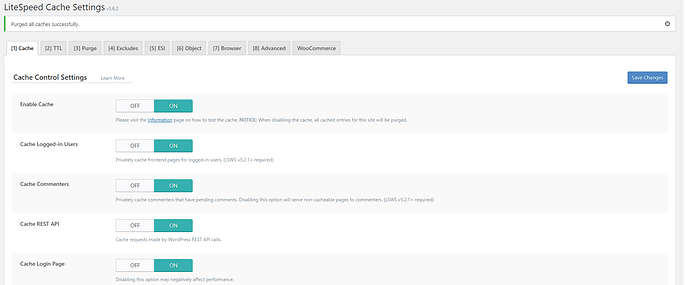
Finally run test by enable Page Caching from LSCache Plugin
Now at the last we enabled cache, optimize CSS and JavaScript, and also done some configurations on LS Cache (activated full-page caching).
- A total number of files while loading: 28
- A number of CSS file: 1
- A number of JS files: 4
- Load Time: 941ms
- Page Size: 3.0 MB
After enabling all these you can see the change and effect after and before caching.
