Sending emails to the inbox is always a tricky thing for even experienced system administrators, running a healthy email server requires great attention. I will be mostly talking about transactional emails in this article, even though it can be applied to marketing emails. Some companies process a large number of transactional emails on daily basis (in millions). Transaction emails involve:
- Account Confirmation Emails (while registration).
- Password Reset Emails (When you forgot the password for some reason).
- Purchase confirmation emails.
- and a lot more…
These emails are much more important, and any company can not afford to have such emails land in spam/junk folder. For say if a purchase confirmation email lands in the spam folder, a company is going to lose a potential customer if they do not check all their folders (thinking email never arrived). Which is why even transactional emails have great importance. There are four things that Google recommends you to have:
- Keep a valid RDNS record against the hostname your mail server is using.
- Publish an SPF record.
- Sign messages with DKIM.
- Publish a DMARC policy.
You can read more about these technologies in our previous article:
How to Manually Set up SPF, DKIM and DMARC Inside CyberPanel
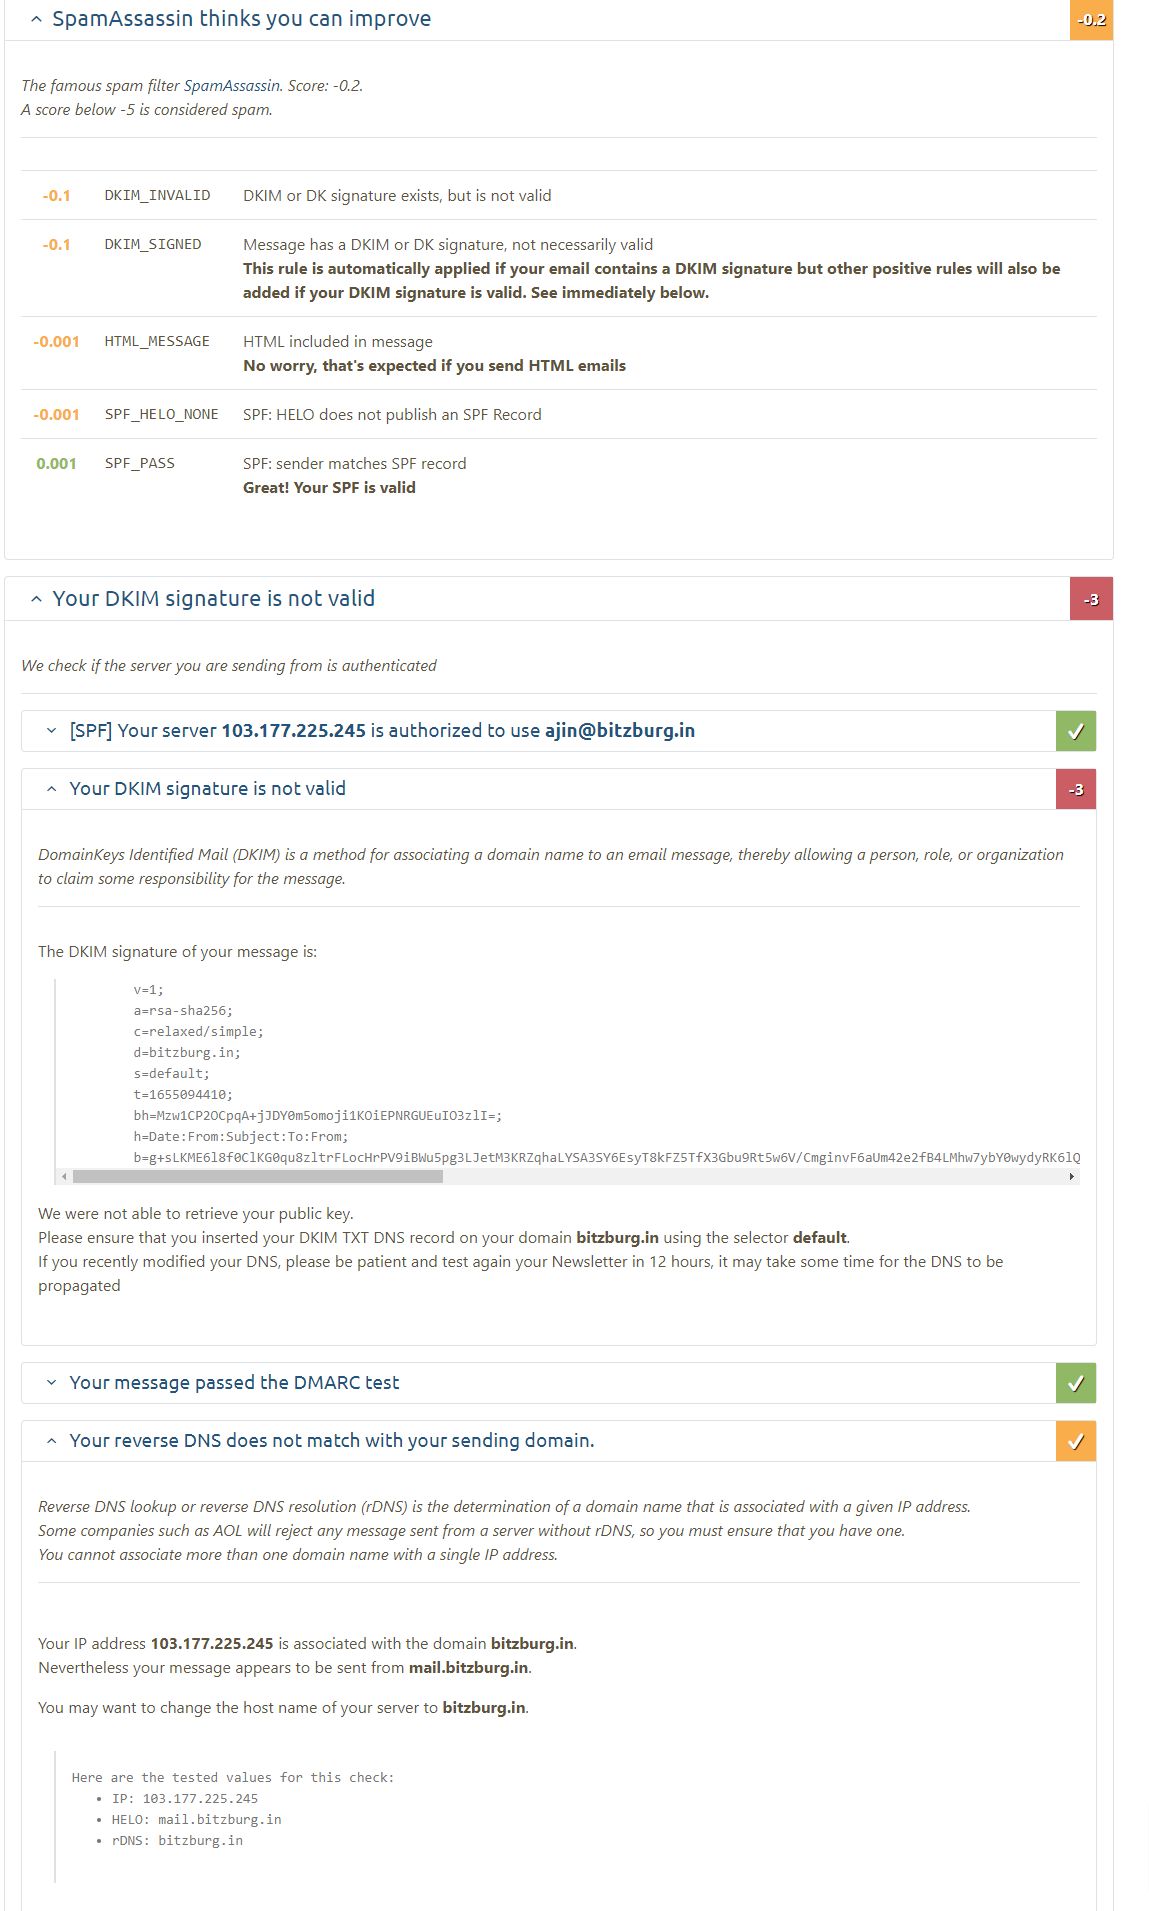
Even after setting all of the above things, your email might end up in spam, from their onwards it totally depends upon the content of your email and how people are reacting to your emails. If they are marking your email as Not Spam then soon you are going to land emails in the inbox. But setting up these 4 things is a must thing and a good start.
Early Days
In early days of CyberPanel, you have to do this all manually. You have to manually setup hostname for your mail server. Please note that hostname here refers to RDNS that you have set. But now you can do that from CyberPanel using the guide below:
SSL For PostFix/Dovecot
This not only issues Let’s Encrypt SSL for PostFix/Dovecot but also set the same domain as the hostname for your mail server, so choose this domain carefully. After setting up hostname you have to take care of SPF, DMARC and DKIM your self. This task is very painful and confusing for people. For your reference these records look like:
| Type | Name | Value |
|---|---|---|
| TXT | talkshosting.com | v=spf1 a mx ip4:192.168.100.1 ~all |
| TXT | _dmarc.talkshosting.com | v=DMARC1; p=none |
| TXT | _domainkey.talkshosting.com | t=y; o=~; |
| TXT | default._domainkey.talkshosting.com | v=DKIM1; k=rsa; p=MIGfMA0GCSqGSIb3DQEBAQUAA4GNA…. |
If you still want to do it the old fashion way, you can create these records manually, replace talkshosting.com with your domain and 192.168.100.1 with your server IP Address. Note that I’ve not pasted the whole value of DKIM record, as it was too long to fit in one box. And to manually set up all of these records you can follow this guide:
How to Manually Set up SPF, DKIM and DMARC Inside CyberPanel
What happens now?
Early days were harsh for us, we need to do everything related to email manually which is not very pleasing. Before moving forward you need to upgrade CyberPanel or install the latest version of CyberPanel. While creating a website on version 1.6.4 (and after) you have another option DKIM Support. What happens if you don’t opt for DKIM Support? We still have following records automatically created:
| Type | Name | Value |
|---|---|---|
| TXT | talkshosting.com | v=spf1 a mx ip4:192.168.100.1 ~all |
| TXT | _dmarc.talkshosting.com | v=DMARC1; p=none |
| TXT | _domainkey.talkshosting.com | t=y; o=~; |
But you can clearly see that our DKIM record is still missing, you can create dkim keys even you didn’t opt for it while creating a website. From this point onwards we will see how we can achieve 10/10 score on http://www.mail-tester.com
The road to achieving 10/10 Mail Score!
Achieving 10/10 mail score may be very hard for some system administrators. In this article, we will see how we can do exactly that.
Step 1: Install or upgrade CyberPanel
Before moving forward you need to upgrade CyberPanel or install the latest version of CyberPanel, so that you are on latest version which contains DKIM Manager (v1.6.4 and after).
Step 2: Make sure CyberPanel is handling your DNS
Nothing is going to work if your DNS is not managed by CyberPanel. We will discuss what to do if DNS is not managed by CyberPanel later in this article. Read the guide to make sure your DNS is managed by CyberPanel:
HOW TO REGISTER PRIVATE NAME SERVERS ON NAMECHEAP OR GODADDY WITH CYBERPANEL!
Step 3: Setup RDNS and Hostname!
This step is very important, I am using talkshosting.com as a hostname in this article. If I check RDNS of my IP Address it should point back to this domain. You can check this here.

As you can see my IP Address points back to talkshosting.com, you should point to your domain. Once you set the RDNS, follow the guide below to setup same domain as a hostname on your mail server too:
SSL For PostFix/Dovecot
So far so good, we now need to create our website with DKIM Support.
Step 4: Create Website with DKIM Support
While creating website remember to check the DKIM Support box.
Once a website is successfully created, following records will automatically be created:
| Type | Name | Value |
|---|---|---|
| TXT | talkshosting.com | v=spf1 a mx ip4:192.168.100.1 ~all |
| TXT | _dmarc.talkshosting.com | v=DMARC1; p=none |
| TXT | _domainkey.talkshosting.com | t=y; o=~; |
| TXT | default._domainkey.talkshosting.com | v=DKIM1; k=rsa; p=MIGfMA0GCSqGSIb3DQEBAQUAA4GNA…. |
Creating DKIM Records Later If for some reason you have not created DKIM records while creating a website you can do so later by navigating to https://:8090/email/dkimManager This will generate DKIM keys and also publish those DKIM public key to your DNS record, which is exactly the same as having DKIM Support while creating a fresh website.
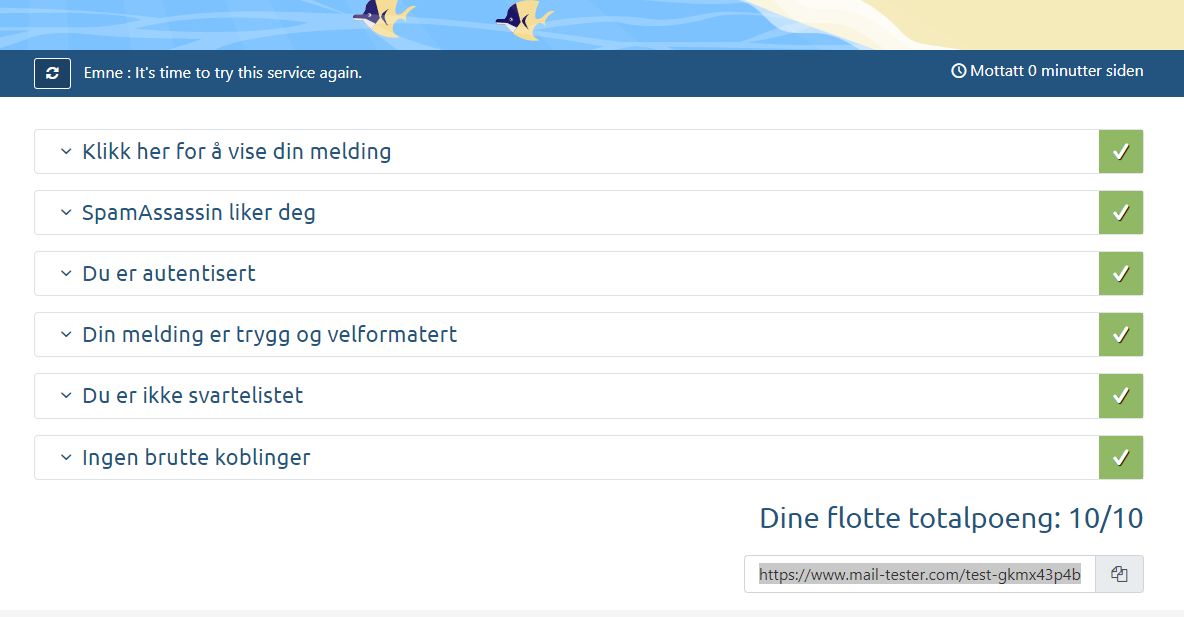
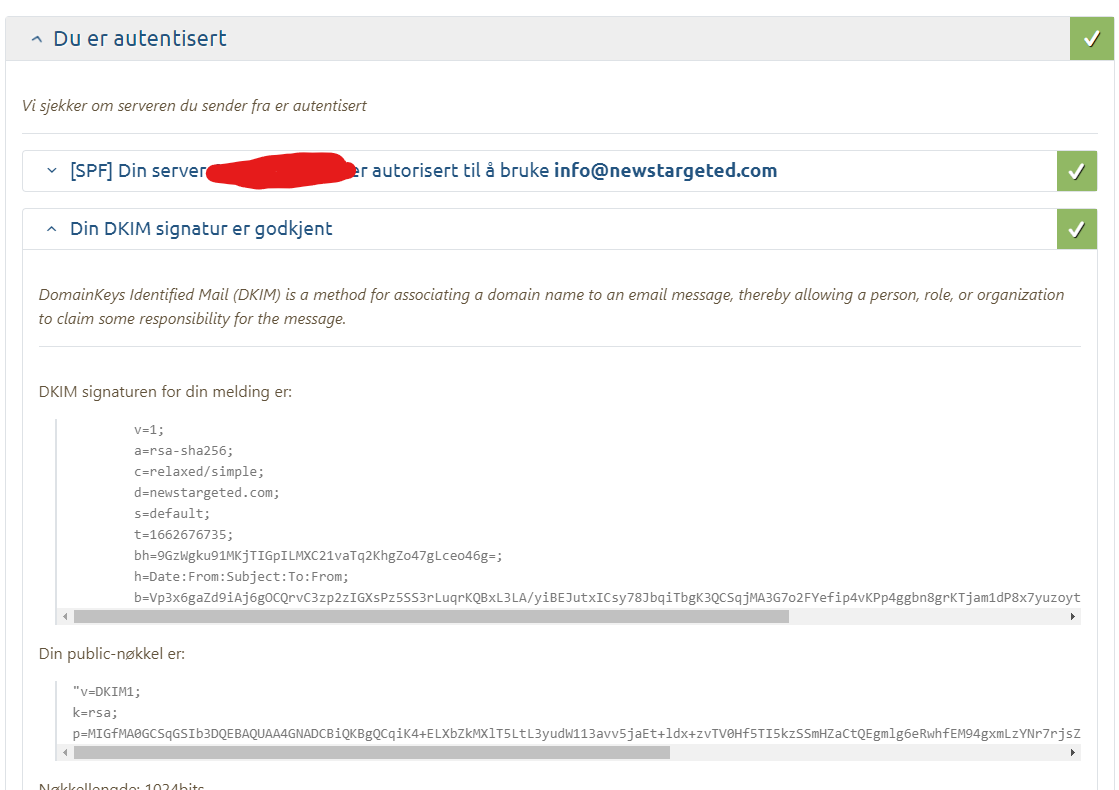
Step 5: Verify your email Score
It is time you verify your email score, open https://www.mail-tester.com/ on your browser. They will provide you with temporary email, you need to send a test email to this email.

And once you click THEN CHECK YOUR SCORE, it should be giving you following output:

How sweet, how hard was it? It was so easy. You need not do anything extra on your end if your DNS is managed by CyberPanel.
What to do if DNS is not managed by CyberPanel
If your DNS is not managed by CyberPanel, you can generate DKIM keys from CyberPanel and publish them where ever your DNS is hosted. First, let’s create other necessary records:
| Type | Name | Value |
|---|---|---|
| TXT | talkshosting.com | v=spf1 a mx ip4:192.168.100.1 ~all |
| TXT | _dmarc.talkshosting.com | v=DMARC1; p=none |
| TXT | _domainkey.talkshosting.com | t=y; o=~; |
| TXT | default._domainkey.talkshosting.com | v=DKIM1; k=rsa; p=MIGfMA0GCSqGSIb3DQEBAQUAA4GNA…. |
Replace domain and IP Address with your domain and IP Address respectively. Once SPF and DMARC are created you then need to generate DKIM keys from CyberPanel, for that navigate to: https://:8090/email/dkimManager Once generated, you will get Private and Public keys, you need to copy public key and form your DKIM record. Record Type: TXT Record Value: default._domainkey.yourdomain.com Record Value: v=DKIM1; k=rsa; p=<PASTE THE PUBLIC KEY YOU GOT FROM CyberPanel>
Your final records in your domain registrar must contain these four entries:
| Type | Name | Value |
|---|---|---|
| TXT | talkshosting.com | v=spf1 a mx ip4:192.168.100.1 ~all |
| TXT | _dmarc.talkshosting.com | v=DMARC1; p=none |
| TXT | _domainkey.talkshosting.com | t=y; o=~; |
| TXT | default._domainkey.talkshosting.com | v=DKIM1; k=rsa; p=MIGfMA0GCSqGSIb3DQEBAQUAA4GNA…. |
And that is all if you are hosting your DNS somewhere else.
Read and send email through Gmail
You can also read and send email through Gmail. Open your Gmail account, go to Settings and then Accounts and Import.

This will open a window:

Enter the email address you have created inside CyberPanel and click Next. On the next window select Import emails from my other account (POP3) and click Next.

- Use complete email as username.
- Enter your email password which you set via CyberPanel while creating this email.
- On the third box, enter the same domain for which you issued SSL (RDNS/Hostname).
- Choose port 995.
Make sure to leave a copy of retrieved messages on the server too, otherwise, they will be deleted from the server, and then click Next. It will then ask you if you also want to use Gmail to send emails from this email.

It is recommended to select the first option as selected in the image above, you can then send emails via Gmail too.

For emails to be sent via Gmail you need to configure SMTP settings that Gmail can use to connect to your mail server.
- On the first box, you again need to enter mail server hostname.
- Use port 587.
- Username is same as your email.
- Enter your email password which you set via CyberPanel while creating this email.
And click Add Account, Gmail will send you a verification email, click the link inside the email and you are done. You will now receive emails inside your Gmail. You can also use Gmail to send an email via the same email.
Conclusion
How easy it was to achieve 10/10 score for your email, for other domains you can do that same. It will be easier if you use CyberPanel to manage DNS for your other domains too, this way you will not have to manually create DNS records at your domain registrar. Feel free to comment below join our Facebook group or Discord for any help. You can also create a helpdesk ticket.